ElasticBeanstalk will create your environment including an S3 bucket, a security group, a load balancer, an auto-scalling group and CloudWatch alarm notifications.
Step 0 - Update Homebrew
brew update && brew doctor
Step 1 - Install ElasticBeanstalk CLI
Normally, you will use the awscli but it's tiresome to write all the commands required to launch an EB app so we will use a better tool, the awsebcli.
brew install awsebcli
Step 2 - Create Permissions
Create a new Policy file and attach it to your IAM user.
ElasticBeanstalk Full Access
AWSElasticBeanstalkFullAccess – Allows the user to create, modify, and delete Elastic Beanstalk applications, application versions, configuration settings, environments, and their underlying resources.
{
  "Version": "2012-10-17",
  "Statement": [
    {
      "Effect": "Allow",
      "Action": [
        "elasticbeanstalk:*",
        "ec2:*",
        "ecs:*",
        "ecr:*",
        "elasticloadbalancing:*",
        "autoscaling:*",
        "cloudwatch:*",
        "s3:*",
        "sns:*",
        "cloudformation:*",
        "dynamodb:*",
        "rds:*",
        "sqs:*",
        "logs:*",
        "iam:GetPolicyVersion",
        "iam:GetRole",
        "iam:PassRole",
        "iam:ListRolePolicies",
        "iam:ListAttachedRolePolicies",
        "iam:ListInstanceProfiles",
        "iam:ListRoles",
        "iam:ListServerCertificates",
        "acm:DescribeCertificate",
        "acm:ListCertificates",
        "codebuild:CreateProject",
        "codebuild:DeleteProject",
        "codebuild:BatchGetBuilds",
        "codebuild:StartBuild"
      ],
      "Resource": "*"
    },
    {
      "Effect": "Allow",
      "Action": [
        "iam:AddRoleToInstanceProfile",
        "iam:CreateInstanceProfile",
        "iam:CreateRole"
      ],
      "Resource": [
        "arn:aws:iam::*:role/aws-elasticbeanstalk*",
        "arn:aws:iam::*:instance-profile/aws-elasticbeanstalk*"
      ]
    },
    {
      "Effect": "Allow",
      "Action": [
        "iam:CreateServiceLinkedRole"
      ],
      "Resource": [
        "arn:aws:iam::*:role/aws-service-role/autoscaling.amazonaws.com/AWSServiceRoleForAutoScaling*"
      ],
      "Condition": {
        "StringLike": {
          "iam:AWSServiceName": "autoscaling.amazonaws.com"
        }
      }
    },
    {
      "Effect": "Allow",
      "Action": [
        "iam:CreateServiceLinkedRole"
      ],
      "Resource": [
        "arn:aws:iam::*:role/aws-service-role/elasticbeanstalk.amazonaws.com/AWSServiceRoleForElasticBeanstalk*"
      ],
      "Condition": {
        "StringLike": {
          "iam:AWSServiceName": "elasticbeanstalk.amazonaws.com"
        }
      }
    },
    {
      "Effect": "Allow",
      "Action": [
        "iam:AttachRolePolicy"
      ],
      "Resource": "*",
      "Condition": {
        "StringLike": {
          "iam:PolicyArn": [
            "arn:aws:iam::aws:policy/AWSElasticBeanstalk*",
            "arn:aws:iam::aws:policy/service-role/AWSElasticBeanstalk*"
          ]
        }
      }
    }
  ]
}
CodeCommit Permissions
custom-codecommit-elasticbeanstalk
{
    "Version": "2012-10-17",
    "Statement": [
        {
            "Sid": "VisualEditor0",
            "Effect": "Allow",
            "Action": [
                "codecommit:*"
            ],
            "Resource": "*"
        }
    ]
}
Elastic Load Balancer
For this blog, we will simply use ElasticLoadBalancingFullAccess.
{
    "Version": "2012-10-17",
    "Statement": [
        {
            "Effect": "Allow",
            "Action": "elasticloadbalancing:*",
            "Resource": "*"
        },
        {
            "Effect": "Allow",
            "Action": [
                "ec2:DescribeAccountAttributes",
                "ec2:DescribeAddresses",
                "ec2:DescribeInternetGateways",
                "ec2:DescribeSecurityGroups",
                "ec2:DescribeSubnets",
                "ec2:DescribeVpcs",
                "ec2:DescribeVpcClassicLink",
                "ec2:DescribeInstances",
                "ec2:DescribeNetworkInterfaces",
                "ec2:DescribeClassicLinkInstances",
                "ec2:DescribeRouteTables",
                "cognito-idp:DescribeUserPoolClient"
            ],
            "Resource": "*"
        },
        {
            "Effect": "Allow",
            "Action": "iam:CreateServiceLinkedRole",
            "Resource": "*",
            "Condition": {
                "StringEquals": {
                    "iam:AWSServiceName": "elasticloadbalancing.amazonaws.com"
                }
            }
        }
    ]
}
Step 3 - Create a Rails App
To keep errors to a minimum, I am going to be explicit with my version of Ruby and Rails. This will save you a lot of pain and time as we start deploying to ElasticBeanstalk.
I am using rbenv to install Ruby. If you do not have rbenv installed, read this tutorial
RBENV_VERSION=2.6.5 rbenv exec rails _5.2.3_ new eb_rails_app -d postgresql
Change directory into my new app.
cd eb_rails_app
Step 4 - Create ElasticBeanstalk Project Directory
Assuming you now have a working app, the next step is to prepare it for deployment. First nitialize the app for ElasticBeanstalk. I prefer to organize my AWS accounts into profiles so we add the --profile flag.
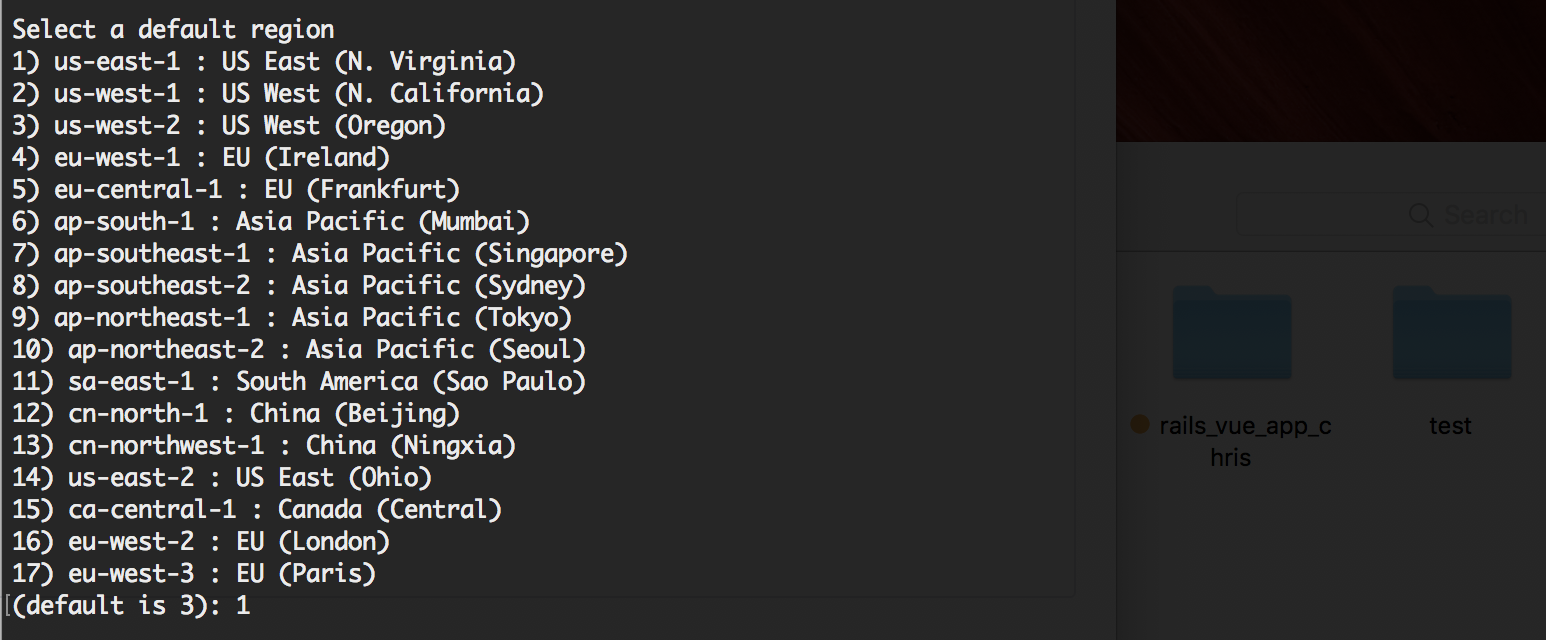
eb init --profile name-of-my-profile
Command-line Prompts
First determine which region you want to deploy the app in.
Next identify which app you want to deploy or select [Create new Application].

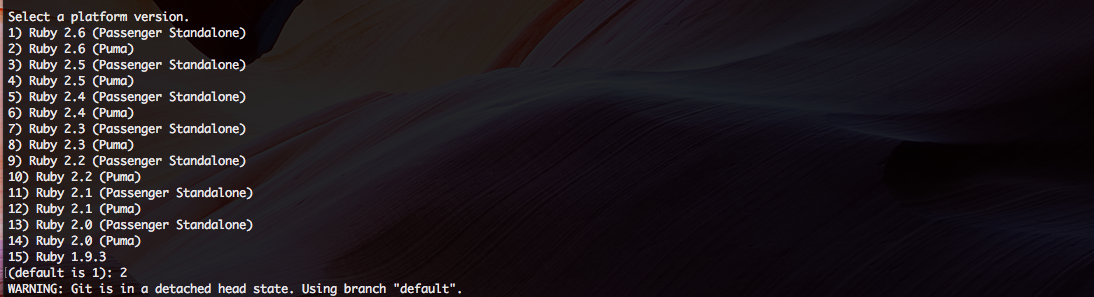
Name your ElasticBeanstalk app.

Since we created a new app using Ruby 2.6.x, I simply select the right option. If you want to learn more about the differences between Puma and Passanger, check out this consumer report.
This new prompt is where you are now asked to deploy your app on CodeCommit. I select yes.

CodeCommit will ask you to name the repository. I pick the same as the app itself.

CodeCommit will also ask for a default branch name. It's standard to pick "master".

AWS will ask you to name the keypair used for granting access.

Step 5 - Create ElasticBeanstalk Environment
Within an ElasticBeanstalk application, you can have multiple environments such as development, staging, production or beta, gamma, and production. As a first step, it helps to think about how you want to view your environment so as a first step, we will check for CNAME availability.
Let's check to see if we can use this CNAME for our environment.
aws elasticbeanstalk check-dns-availability --profile burner --region us-east-1 --cname-prefix my-app-env
aws elasticbeanstalk create-environment --cname-prefix my-app-dev --application-name my-app --template-name v1 --version-label v1 --environment-name v1 --option-settings
eb create my-app-env \
--cname my-app-dev \
--region us-east-1 \
--instance_type t1.micro \
--tags environment=dev,app=my-app-env
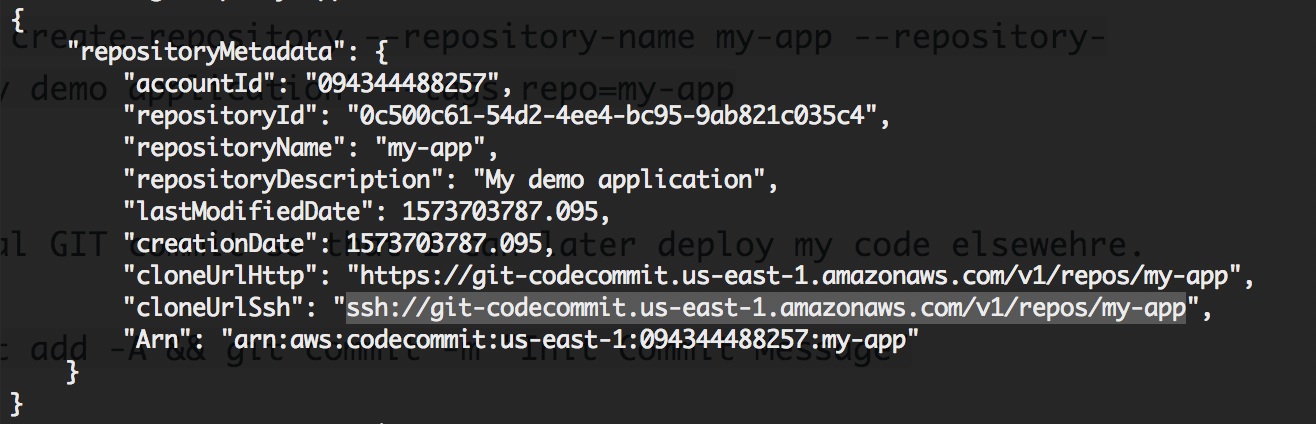
Step 6 - Create a CodeCommit Repo and push your local work
aws codecommit create-repository --repository-name eb_rails_app --repository-description "My ElasticBeanstalk Rails App" --tags repo=my-app
Create an inital GIT commit so that I can later deploy my code elsewehre.
git init && git add -A && git commit -m "Init Commit Message"
Commit a local repo to CodeCommit.
git remote add origin ssh://path-from-command-above
git push --set-upstream origin master
Step 7 - Init + Deploy App
Build your custom platform and include a platform version.
eb create my-app-dev
Test out a change before you commit.
eb deploy --staged
eb deploy
Configuring SSH and GIT
~/.gitconfig
[credential "https://git-codecommit.us-east-1.amazonaws.com"]
	helper = !aws codecommit credential-helper $@
	UseHttpPath = true
~/.ssh/codecommit_rsa.pub
ssh-rsa AAAAB3NzaC1yc2EAAAADAQABAAACAQCyCsEa7F.....
~/.ssh/config
Host git-codecommit.*.amazonaws.com
  # AWS
  User XXXX
  IdentityFile ~/.ssh/codecommit_rsa
Appendix
- Ruby Supported Platform Versions
- AWS ElasticBeanstalk deploying an app.
- AWS ElasticBeanstalk platform.
- Setting up Git Credential Helpers
- AWS CodeCommit working with repositories.
- Excellent Read from jameshamann@