Many development teams use Jenkins to automate and schedule tasks, tests, and more. I often schedule end-to-end tests to ensure a service is working as expected.
There are many ways to install Jenkins, but this blog entry will focus on VirtualBox and Vagrant.
As a Mac user, if you're curious to know why this approach is better than Homebrew, it's not. Homebrew is excellent, and here's a tutorial. My goal for using VirtualBox with Vagrant is to simulate a production-ready system for the cloud better. It's common to run Jenkins on a dedicated machine than on my local computer.
The instructions below will show you how to install Jenkins on Linux Debian that you can later re-create elsewhere.
Step 1 - Install VirtualBox Locally
VirtualBox is a tool for creating virtual machines on your local computer. It can do much more, but for now, all we need is a machine to host Jenkins.
Option 1 - Download VirtualBox installer
You can download the installer from the VirtualBox website.
Option 2 - Install using Homebrew
I prefer using Homebrew for managing my apps.
brew install --cask --force VirtualBox --verbose --debug
Step 2 - Install Vagrant Locally
Vagrant is used to help you create (and re-create) a development environment. Think of it this way, VirtualBox allows you to make a virtual computer, but Vagrant will help you configure your machine to serve a specific purpose.
Option 1 - Download Vagrant Installer
You can download and install Vagrant using the installer.
Option 2 - Install using Homebrew
Using Homebrew, type this in.
brew install --cask vagrant
Manage your vagrant machines in one place with Vagrant Manager for OS X.
brew install --cask vagrant-manager
Step 3 - Create a Config file
Vagrant works by first creating a configuration file. The file is titled Vagrantfile and will explain that we will install Jenkins. Open up Terminal and type:
vagrant init debian/jessie64
You can find other Vagrant setups through Vagrant Cloud.
Step 4 - Modify Vagrantfile
Open up ~/Vagrantfile and uncomment the line of code below. This will allow us to use the Jenkins web interface for its configuration.
config.vm.network "private_network", ip: "192.168.33.10"
Step 5 - Start downloading
Now that you've configured your Vagrantfile, it's time to start downloading.
vagrant up
Step 6 - Log into your dev environment
Vagrant's ssh command will allow you to log into your newly installed development environment.
vagrant ssh
Step 7 - Install Jenkins
Now that you've ssh'd into your dev environment, it's time to download Jenkins. The easiest thing for us to do is follow these instructions.
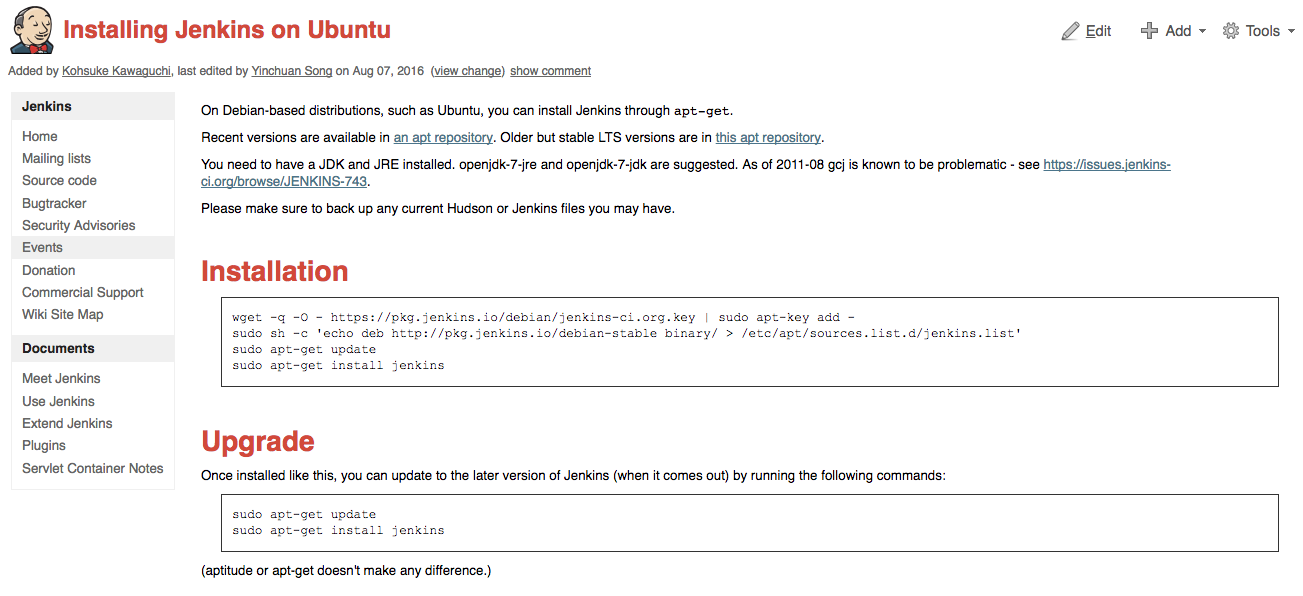
wget -q -O - http://pkg.jenkins-ci.org/debian/jenkins-ci.org.key | sudo apt-key add -
sudo sh -c 'echo deb http://pkg.jenkins-ci.org/debian binary/ > /etc/apt/sources.list.d/jenkins.list'
Advanced Package Tools apt-get is a package manager for Debian, and all we're asking it to do is the update.
sudo apt-get update && sudo apt-get upgrade
Ask apt-get to install Jenkins.
sudo apt-get install --force-y Jenkins
Step 8 - Visit the Admin Portal
Visit http://192.168.33.10:8080/login to see how things look.
Step 9 - Log In
Open up jenkins.log to find the initial administrative password.
vi /var/log/jenkins/jenkins.log
Step 10 - Install additional plugins
Congratulations! You've installed VirtualBox, Vagrant, and Jenkins. All that's left is a few more Jenkins plugins.
Ta Da!
Now it's time to get started.