
It took me a while to figure out how to create simple, elegant routes within Angular so I hope this will help anyone interested in doing simple stuff like:
- http://localhost:4200/pages/login
- http://localhost:4200/pages/register
- http://localhost:4200/pages/lock
- http://localhost:4200/home
- http://localhost:4200/login
- http://localhost:4200/
If you want to try this out, I've uploaded the demo on Github
Goals
Here are a few other things I expect from these elegant routes.
- I want to create custom layouts for specific sections such as
/pagesandprofile. - I want to continue using Angular's component-based architecture.
- I want to use as much boilerplate code as possible for code re-use and transferability.
Solution
The magic is through the use of modules and routes. Thankfully, Angular cli provides a command that does 90% of the work.
Step 1 - Create an Angular App
Here's my previous tutorial on how to create an Angular app.
Step 2 - Create a Component
HomeComponent
This component will serve as our homepage.
ng g component home
Step 3 - Create a Module
We're going to create a module for the next few components. Think of a module as a sort of wrapper. It's going to bind the following components together through routing.
Create a module and include the --routing flag.
ng g module pages --routing
Pages Component
The next few component will serve as secondary pages to the homepage. They offer authentication such as register, login and lock. Take notice that I am creating these components within the pages directory.
Create three components: login, register, lock.
ng g component pages/login
ng g component pages/lock
ng g component pages/register
Step 4 - Create a Layout Component
To show you how flexible this process is, let's also create a layout component in a different directory. This layout directory is where you can create re-usable HTML that will appear throughout login, register, and lock.
ng g component shared/layouts/auth-layout
NOTE: If you place a hyphen between two words, it will create a pretty CamelCase-looking AuthLayoutComponent instead of AuthlayoutComponent
Step 5 - Double Check Your Module
Here's what your shell should look like.
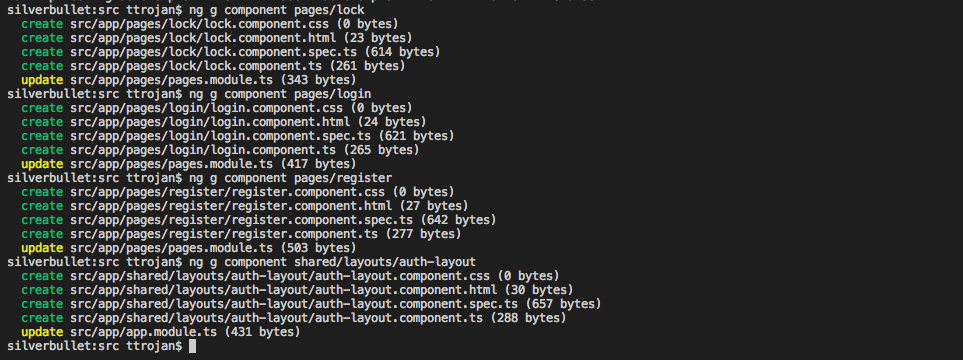
If you followed the previous steps correctly, you should notice that pages/pages.module.ts is completely filled out.
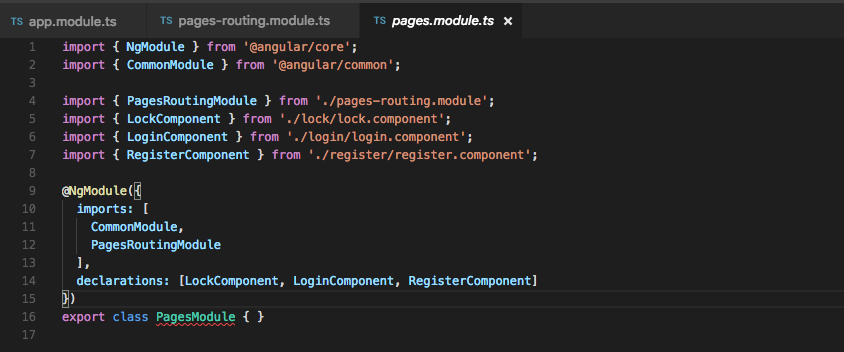
What's important to understand that is Angular Cli not only created and imported your components into pages.module.ts but it also automagically inserted the components into the declarations array. You must declare your components.
Step 6 - Create Our Routes
Time to edit pages/pages-routing.module.ts.
import { NgModule } from '@angular/core';
import { Routes, RouterModule } from '@angular/router';

import { LockComponent } from './lock/lock.component';
import { LoginComponent } from './login/login.component';
import { RegisterComponent } from './register/register.component';

const routes: Routes = [
  {
    path: '',
    children: [
      { path: 'login', component: LoginComponent },
      { path: 'lock', component: LockComponent },
      { path: 'register', component: RegisterComponent }
    ]
  }
];

@NgModule({
  imports: [RouterModule.forChild(routes)],
  exports: [RouterModule]
})
export class PagesRoutingModule { }
All we are doing is importing our components and creating routes.
Step 7 - Edit our HTML
We're going to add <router-outlet></router-outlet> to a few files.
Edit Auth Layout
Edit /shared/layouts/auth-layout and paste this HTML.
<p>
  auth-layout works!
</p>

<router-outlet></router-outlet>
Edit Main App
Next, edit app.component.html
<!--The content below is only a placeholder and can be replaced.-->
<p>
  app.component.html
</p>
<router-outlet></router-outlet>
Step 8 - Create a Main Module + Route
There are many ways to create a main router. In order to stay within our command-line pattern, I will simply create another module. I'm naming my module main but you can name it whatever makes sense for your app.
ng g module main --routing
This will create another module and wire it up with app.module.ts.
Step 9 - Edit Your Main Route
Open main/main-routing.module.ts and paste this:
import { NgModule } from '@angular/core';
import { Routes, RouterModule } from '@angular/router';

import { HomeComponent } from '../home/home.component';
import { AuthLayoutComponent } from '../shared/layouts/auth-layout/auth-layout.component';

export const routes: Routes = [
  { path: '', redirectTo: '/home', pathMatch: 'full' },
  { path: 'login', redirectTo: '/pages/login', pathMatch: 'full' },
  { path: '', component: AuthLayoutComponent,
      children: [
        { path: 'pages', loadChildren: '../pages/pages.module#PagesModule' }
      ]
    },
  { path: 'home', component: HomeComponent },
  { path: '**', component: HomeComponent }
];

@NgModule({
  imports: [RouterModule.forRoot(routes)],
  exports: [RouterModule]
})
export class MainRoutingModule { }
Notes
There are a lot of fancy things going on here so here are the highlights:
- Within the NgModule decorator, there's a special use of
forRoot. This is the main router. - The second route is how we do redirects.
- The third route shows you how to use a specific layout for a group of pages.
AuthLayoutComponentwill decorate the children pages that follow. - We are using a special technique called "Lazy Loading" to load the
pagesmodule. This is a really smart way to improve your app's performance by not loading components until they are needed. - The final route uses
**to serve as a "catch all". This ensures that your app doesn't show a 404.
Step 10 - Final Step
The final step is to update app.module.ts and import the new MainRoutingModule.
import { BrowserModule } from '@angular/platform-browser';
import { NgModule } from '@angular/core';

import { AppComponent } from './app.component';
import { HomeComponent } from './home/home.component';

import { MainRoutingModule } from './main/main-routing.module';
import { PagesLayoutComponent } from './shared/layouts/pages-layout/pages-layout.component';

@NgModule({
  declarations: [
    AppComponent,
    HomeComponent,
    PagesLayoutComponent
  ],
  imports: [
    BrowserModule,
    MainRoutingModule
  ],
  providers: [],
  bootstrap: [AppComponent]
})
export class AppModule { }
Step 11 - You're Done
Fire up ng serve and give your app a try.
- http://localhost:4200/pages/login
- http://localhost:4200/pages/register
- http://localhost:4200/pages/lock
- http://localhost:4200/login
- http://localhost:4200/home
- http://localhost:4200/
What's nice about this module/routing strategy is that it also keep your app.module.ts tidy. You don't have to front-load every component.
Resources

Typescript Bundle for Textmate
Here's my attempt to offer code highlighting to Textmate users working with Typescript. I'm positive there is a better way to do this so...
Angular: Working with Google Material Design
Here's how to install Angular Material [https://material.angular.io/] into your Angular app. -------------------------------------------------------------------------------- Step 0 - Install Angular Install Angular [https://www.chrisjmendez.com/2017/07/...
Troubleshooting Angular
Angular development moves so quickly that there's a really good chance you'll have to troubleshoot your installation. Below are a few common problems I...