Amazon Web Services offers a suite of tools for podcast producers to distribute their audio online. There's CloudFront for caching, S3 for storage, Glacier for long-term storage, Elemental for real-time distributing, Tailor for server-side ad insertion. I thought it would be to fun to show how to use Elastic Transcoder convert a single uncompressed .wav file into multiple .mp4's with different bit-rates for iTunes, Spotify, and more.
By the end, you will be able to drop a single file into S3 and use Elastic Transcoder to create multiple renditions within seconds.
Why all the effort?
There are a lot of excellent podcasting apps that will automatically create MP3 or MP4 files for iTunes. If this is your workflow, then this article won't help you. This tutorial is for the hundreds of professional-grade recording studios who use DAW's such as Pro Tools, Logic, or Adobe Audition to produce high-quality content. These studios often use audio formats such as .wav, .aiff, .flac or even .sdii. Aside from creating high-end audio programming, producers must also consider storing their 50MB files for archival purposes and creating multiple audio renditions for both broadcast and internet distribution. This is where AWS Elastic Transcoder shines bright. Instead of manually bouncing your final mixes to 128kpbs, 256kpbs, 320kbps, 192kbps .mp3 and/or .mp4's. Instead, you can simply upload a single wav and allow the cloud to archive your work, create multiple renditions and prepare it for internet distribution in a matter of seconds!
Workflow
Here's a quick summary of the final workflow.
- I will upload my podcast in uncompressed
.wavformat to an AWS S3 bucket. - AWS S3 will notify AWS Lambda that a file has been successfully uploaded.
- AWS Lambda will create a job within AWS Elastic Transcoder and send the wav file payload for processing.
- AWS Elastic Transcoder will generate an HE-AAC MP4 rendition of my wav file.
- After the rendition has been created, the file will be stored in a different AWS S3 bucket.
User Uploads WAV => S3 Input => Lambda => Elastic Transcoder => S3 Output
Getting started
We will use NodeJS to create our lambda code. AWS Lambda also also works with Python, and Java but Javascript is pretty much the universal language for the web.
Step 1 - Install Node through Homebrew
Here's my tutorial on how to install Node Version Manager using Homebrew package manager.
Step 2 - Install AWS SDK
Here's another tutorial on how to install AWS SDK using Homebrew
You may also need to learn how to create an AWS Cli profile.
Step 3 - Create two S3 Buckets
You will need two S3 buckets. The first bucket will be your source where you initially place your material. Your second bucket is your destination.
My source bucket will be called "podcast-wav" and my destination bucket will be called "podcast-mp4".
Step 4 - Add a policy file for your destination bucket
After you've created your destination bucket, go to "Permissions" > "Bucket Policy" and paste this inside the Bucket policy editor.
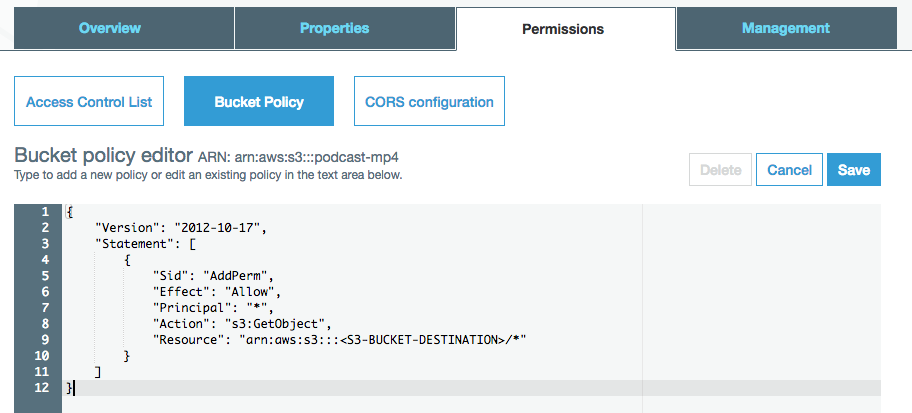
This policy file will allow you to share your podcast to the world by allowing GET requests.
TAKE NOTE THAT YOU MUST ADD YOUR OWN BUCKET NAME BELOW.
{
	"Version": "2012-10-17",
	"Statement": [
		{
			"Sid": "AddPerm",
			"Effect": "Allow",
			"Principal": "*",
			"Action": "s3:GetObject",
			"Resource": "arn:aws:s3:::<S3-BUCKET-DESTINATION>/*"
		}
	]
}
Step 5 - Create an Elastic Transcoder Pipeline
The Elastic Transcoder pipeline is the process you create to convert your .wav file into an .mp4. Once you create a pipeline, you then create jobs which will execute your process through the pipeline.
For this example, I am using AWS region N. Virginia (aka us-east-1).
Visit AWS Elastic Transcoder Pipeline and click "Create New Pipeline".

Fill out the new pipeline form. Here's what mine looks like.
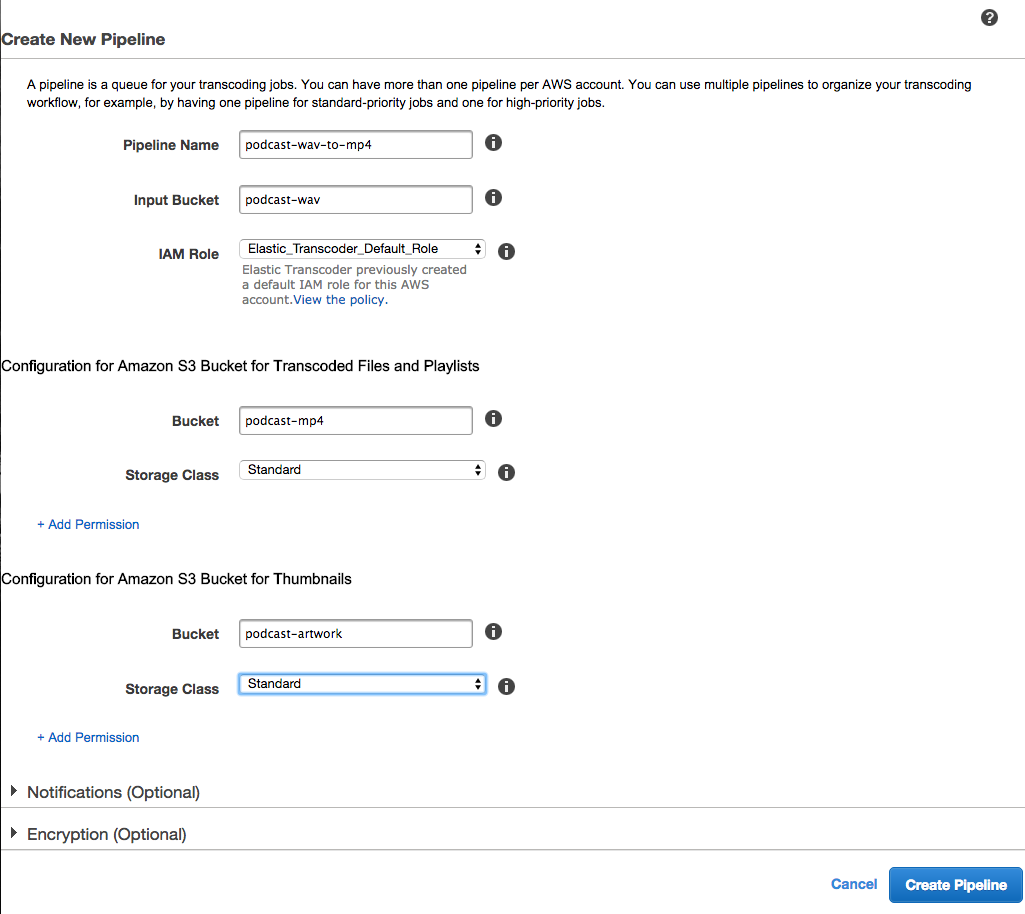
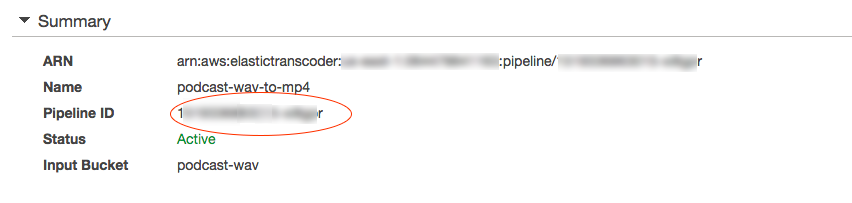
Once you've created your pipeline, take note of your Pipeline ID.
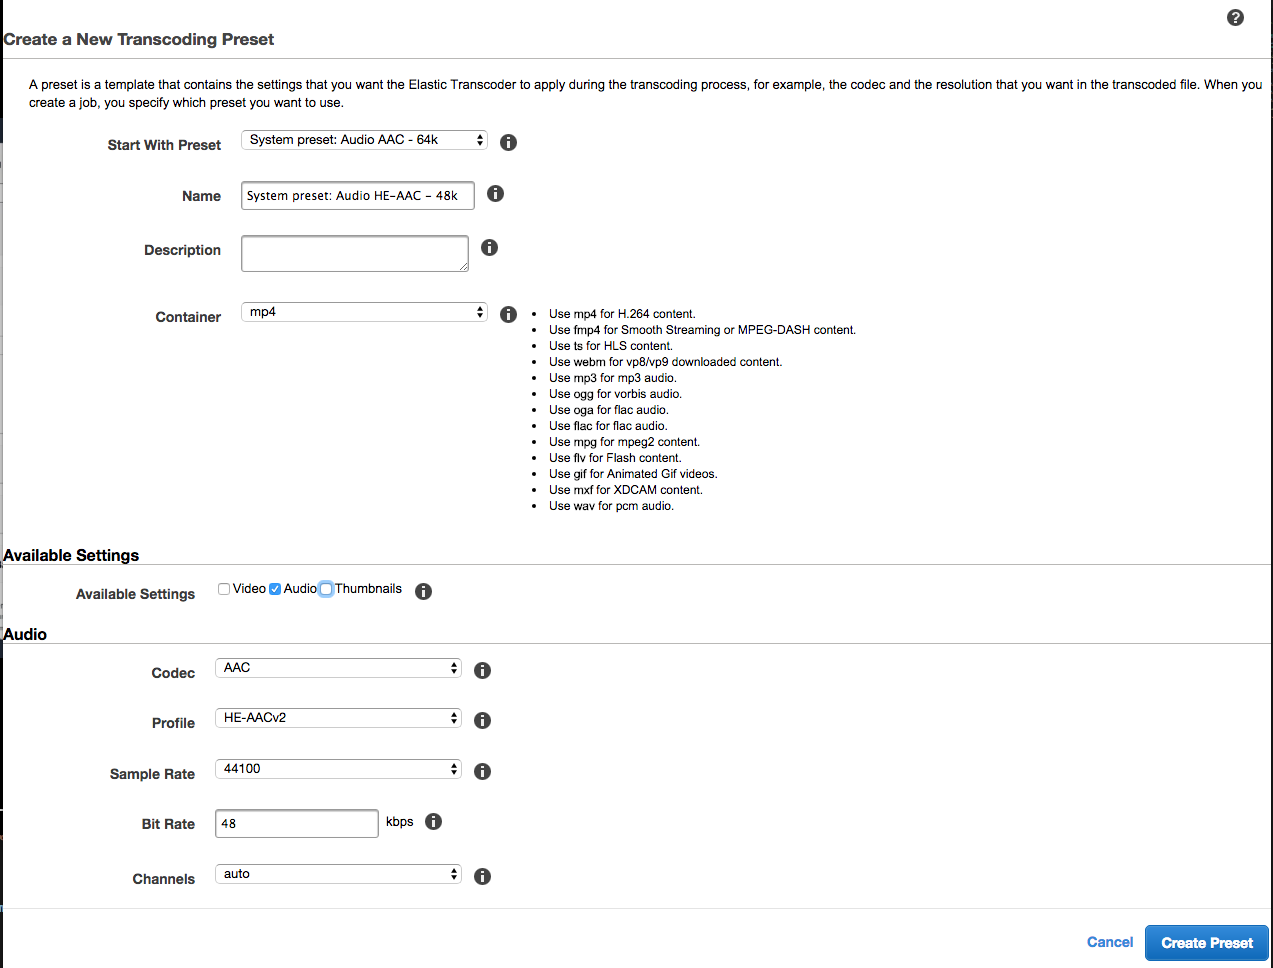
Step 6 - Create an HE-AAC Preset
Amazon already provides dozens of presets for rendering audio and video but there isn't one for HE-AAC so we're going to create our own.
Visit the preset tab and create a new preset.

Configure the preset for HE-AAC @ 48kbps.
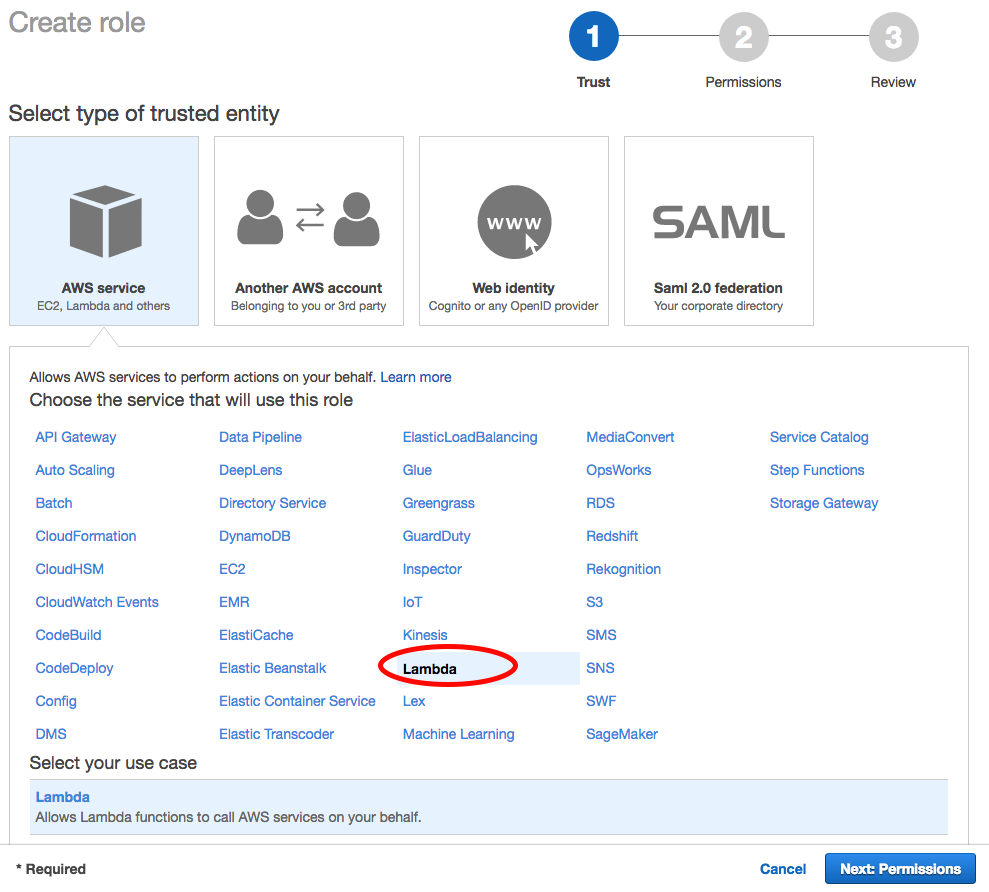
Step 7 - Create an IAM role that allows Lambda to interact with S3 and Elastic Transcoder
Now that you have buckets and a pipeline, we'll need to create a role that allows AWS Lambda to interact between the two services on your behalf. You can accomplish this by creating a role using Identity Access Management.
Creating a Role
Visit AWS IAM and create a new role.

Select Lambda.
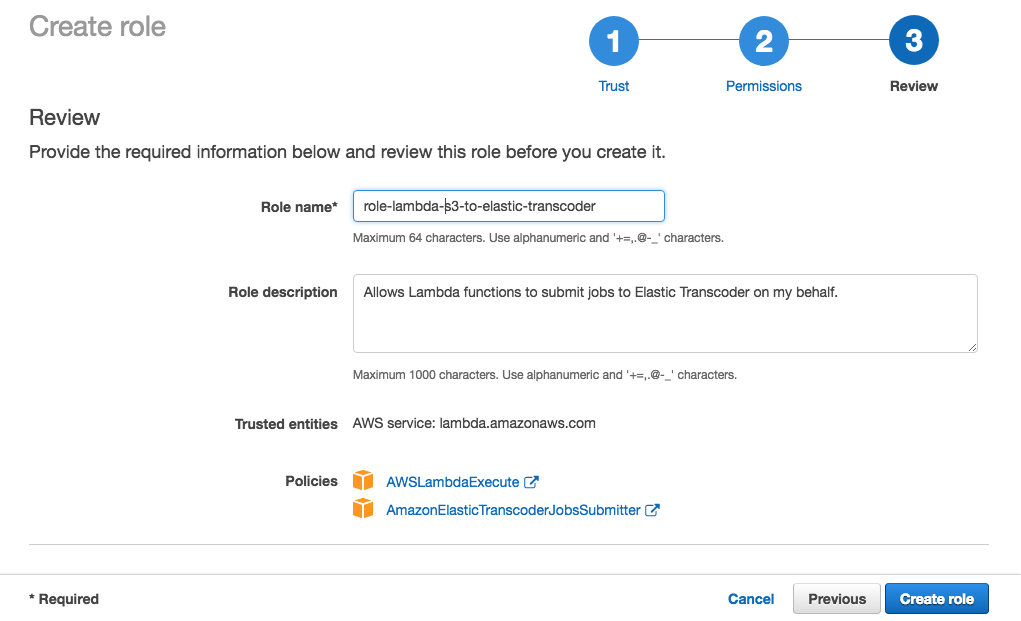
Attaching Permissions
We want our role to do two things:
- Execute Lambda functions (
AWSLambdaExecute) - Submit jobs to Elastic Transcoder (
AmazonElasticTranscoderJobsSubmitter)
Step 8 - Create a Lambda function
Visit AWS Lambda and create a new function.

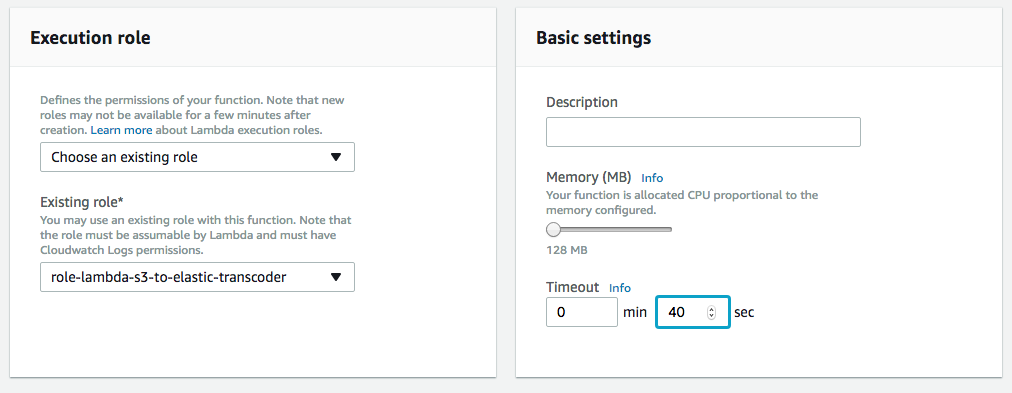
Choose the existing role we created in Step 6. I will also choose Node.js for my runtime.
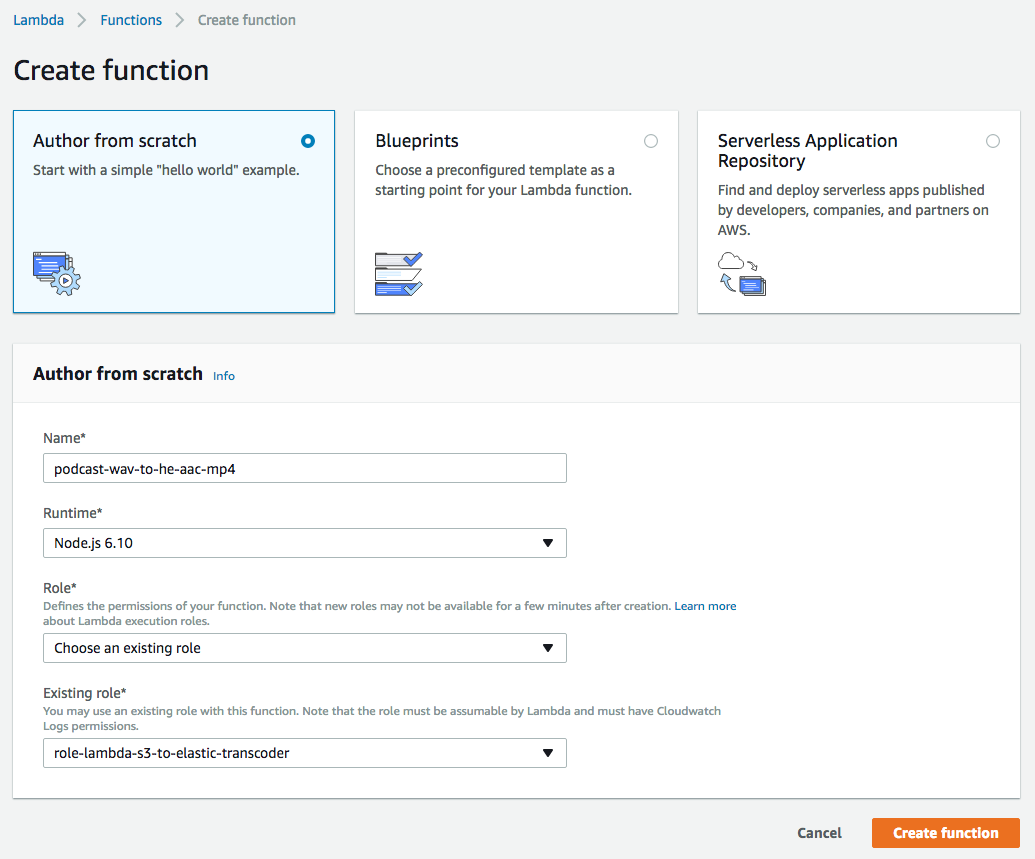
If you notice, I also plan to encode my audio file using HE-AAC compression. The file format will still be .mp4 but HE-AAC is uniquely good at creating 48kpbs streams which sound like 96kbps .mp3's.
Step 9 - Configure the Lambda basic settings
We specifically want to adjust the Timeout setting within the section "Basic Settings". Since we are working with large files, we'll want to make sure that provide ample time for Lambda to do its work. Otherwise, the function execution will fail.
I'll choose 40 seconds.
Step 10 - Create a custom Lambda function
Although we've created an initial Lambda function using the brower console in step 8, it's somewhat impractical to actually write code within the browser. Instead, we're going to write code on our local computer and upload it to the browser.
There are many more ways to create and publish Lambda code but to keep this article simple, we will write some code, install some libraries and package the code and upload a .zip file.
A - Create a folder
Open up Terminal and create a new folder to store your lambda file.
mkdir mylambdafunc
cd mylambdafunc
B - Create a package file
If you are familiar with NodeJS and NPM, this is a package.json file that will help you package the code you need for Lambda deployment.
Create a file titled package.json
vim package.json
and paste this code.
{
  "name": "podcast-wav-flac-to-mpeg",
  "version": "1.0.0",
  "description": "Upload a WAV file to s3://podcast-wav and have Elastic Transcoder create a rendition and output it at s3://podcast-mp4",
  "main": "index.js",
  "scripts": {
    "launch": "npm run package && npm run deploy",
    "deploy": "aws lambda update-function-code --region us-east-1 --profile myprofile --function-name arn:aws:lambda:us-east-1:xxxxxx:function:podcast-wav-to-he-aac-mp4 --zip-file fileb://Lambda-WAV-to-MP4.zip",
    "package": "zip -r Lambda-WAV-to-MP4.zip * -x *.zip *.json *.log"
  },
  "dependencies": {
    "aws-sdk": "^2.3.2"
  },
  "author": "Chris Mendez",
  "license": "MIT",
  "devDependencies": {
  }
}
C - Create the Lambda function
Create a file named index.js
vim index.js
and paste this code.
NOTE: Yes, this code is begging for a date with DRY principles but I want to make sure that beginning programmers see the pattern.
/**
 * Created by Chris Mendez
 * Last Updated: 01/01/2018
 * Documentation:
 *   Album Artwork Context: https://docs.aws.amazon.com/elastictranscoder/latest/developerguide/job-settings.html#job-settings-album-art
 *   Elastic Transcoder Docs and Examples:
 *     This document has the exact key params you should use.
 *     https://docs.aws.amazon.com/AWSJavaScriptSDK/latest/AWS/ElasticTranscoder.html
 *     This document has examples of the types of values you should use. DO NOT TRUST THE KEY NAMES!
 *     https://docs.aws.amazon.com/elastictranscoder/latest/developerguide/create-job.html#create-job-examples
 */

'use strict';
var AWS = require('aws-sdk');

var elasticTranscoder = new AWS.ElasticTranscoder({
    region: process.env.ELASTIC_TRANSCODER_REGION
});

exports.handler = function(event, context, callback){
    var localTime = new Date(new Date().getTime() + new Date().getTimezoneOffset() * 60000).toString()
    console.log('\n~~ TRANSCODER JOB CREATED ~~', localTime );
    console.log('event: ' + JSON.stringify(event));

    var key = event.Records[0].s3.object.key;

    // Replace any spaces with '+'
    var sourceKey = decodeURIComponent(key.replace(/\+/g, ' '));

    // Remove the filename extension
    var outputKey = sourceKey.split('.')[0];
    // Within my s3 bucket, this will be the name of my /directory
    var outputKeyDir = new Date().getFullYear().toString() //"podcasts";

    var params = {
        PipelineId: process.env.ELASTIC_TRANSCODER_PIPELINE_ID,
        OutputKeyPrefix: outputKeyDir + '/',
        Input: {
            Key: sourceKey
        },
        Outputs: [
            {
                Key: outputKey + '-48k' + '.mp4',
                AlbumArt: {
                    MergePolicy: 'Fallback',
                    Artwork: [{
                        AlbumArtFormat: 'png',
                        InputKey: 'generic-album-artwork-3000x3000.png',
                        MaxHeight: '3000',
                        MaxWidth: '3000',
                        PaddingPolicy: 'NoPad',
                        SizingPolicy: 'Fit'
                    }]
                },
                PresetId: '1519356733417-70ti8w' //Custom HE-AAC 48k
            },
            {
                Key: outputKey + '-128k' + '.mp4',
                AlbumArt: {
                    MergePolicy: 'Fallback',
                    Artwork: [{
                        AlbumArtFormat: 'png',
                        InputKey: 'generic-album-artwork-3000x3000.png',
                        MaxHeight: '3000',
                        MaxWidth: '3000',
                        PaddingPolicy: 'NoPad',
                        SizingPolicy: 'Fit'
                    }]
                },
                PresetId: '1351620000001-100130' //Preset AAC 128k
            },
            {
                Key: outputKey + '-160k' + '.mp4',
                AlbumArt: {
                    MergePolicy: 'Fallback',
                    Artwork: [{
                        AlbumArtFormat: 'png',
                        InputKey: 'generic-album-artwork-3000x3000.png',
                        MaxHeight: '3000',
                        MaxWidth: '3000',
                        PaddingPolicy: 'NoPad',
                        SizingPolicy: 'Fit'
                    }]
                },
                PresetId: '1351620000001-100120' //Preset AAC 160k
            },
            {
                Key: outputKey + '-256k' + '.mp4',
                AlbumArt: {
                    MergePolicy: 'Fallback',
                    Artwork: [{
                        AlbumArtFormat: 'png',
                        InputKey: 'generic-album-artwork-3000x3000.png',
                        MaxHeight: '3000',
                        MaxWidth: '3000',
                        PaddingPolicy: 'NoPad',
                        SizingPolicy: 'Fit'
                    }]
                },
                PresetId: '1351620000001-100110' //Preset AAC 256k
            },
            {
                Key: outputKey + '-128k' + '.mp3',
                AlbumArt: {
                    MergePolicy: 'Fallback',
                    Artwork: [{
                        AlbumArtFormat: 'png',
                        InputKey: 'generic-album-artwork-3000x3000.png',
                        MaxHeight: '3000',
                        MaxWidth: '3000',
                        PaddingPolicy: 'NoPad',
                        SizingPolicy: 'Fit'
                    }]
                },
                PresetId: '1351620000001-300040' //Preset Mp3 128k
            },
            {
                Key: outputKey + '-160k' + '.mp3',
                AlbumArt: {
                    MergePolicy: 'Fallback',
                    Artwork: [{
                        AlbumArtFormat: 'png',
                        InputKey: 'generic-album-artwork-3000x3000.png',
                        MaxHeight: '3000',
                        MaxWidth: '3000',
                        PaddingPolicy: 'NoPad',
                        SizingPolicy: 'Fit'
                    }]
                },
                PresetId: '1351620000001-300030' //Preset Mp3 160k
            },
            {
                Key: outputKey + '-192k' + '.mp3',
                AlbumArt: {
                    MergePolicy: 'Fallback',
                    Artwork: [{
                        AlbumArtFormat: 'png',
                        InputKey: 'generic-album-artwork-3000x3000.png',
                        MaxHeight: '3000',
                        MaxWidth: '3000',
                        PaddingPolicy: 'NoPad',
                        SizingPolicy: 'Fit'
                    }]
                },
                PresetId: '1351620000001-300020' //Preset Mp3 192k
            }
        ]
    };

    elasticTranscoder.createJob(params, function(error, data){
        if (error){
            callback(error);
        }
        console.log('elasticTranscoder callback data: ' + JSON.stringify(data));
    });
};
You'll notice that I'm referencing a image called "generic-album-artwork-3000x3000.png". It's a 3000px x 3000px album art square. The file lives in "podcast-wav" and serves as back-up in case the source file I upload doesn't have one.
D - Package your app
First install any dependencies.
npm i
Package the app into a zip file.
npm run package
If you do this correctly, Node Package Manager will look at package.json and run this command.
zip -r Lambda-WAV-to-MP4.zip * -x *.zip *.json *.log
E - Upload your Zip file into lambda web console
Now that you've created your Lambda function package and zipped it, now it's time to upload it to the Lambda console.
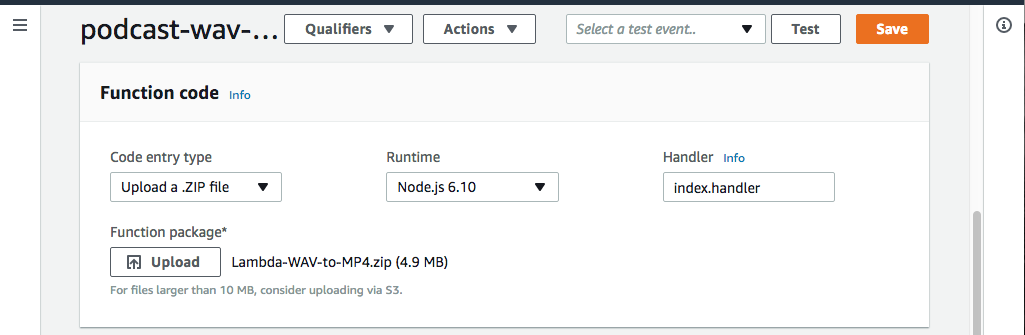
Don't forget to select "Save"
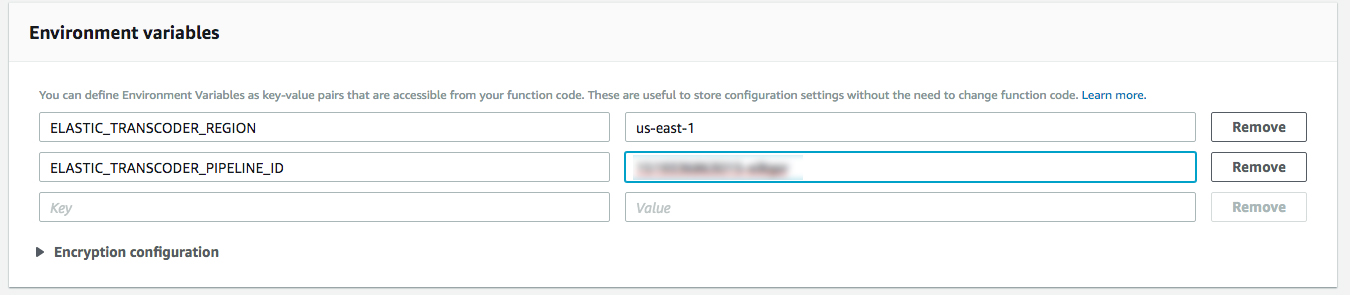
Step 11 - Configure the Lambda environmental variables
The next step is to configure your environmental variables. This is is an elegant way to keep your Lambda function flexible enough that you can continue modifying it with dynamic variables. Here's how it will look.
These two functions within index.js will get data


From this environtmental variables section.
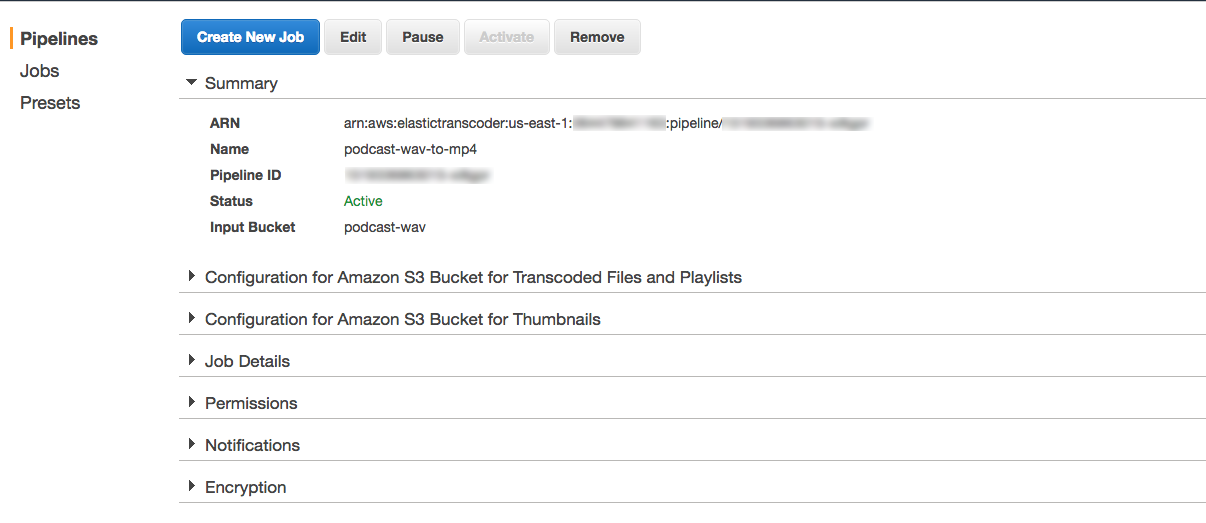
You can find your pipeline by clicking on the details from the Elastic Transcoder list view

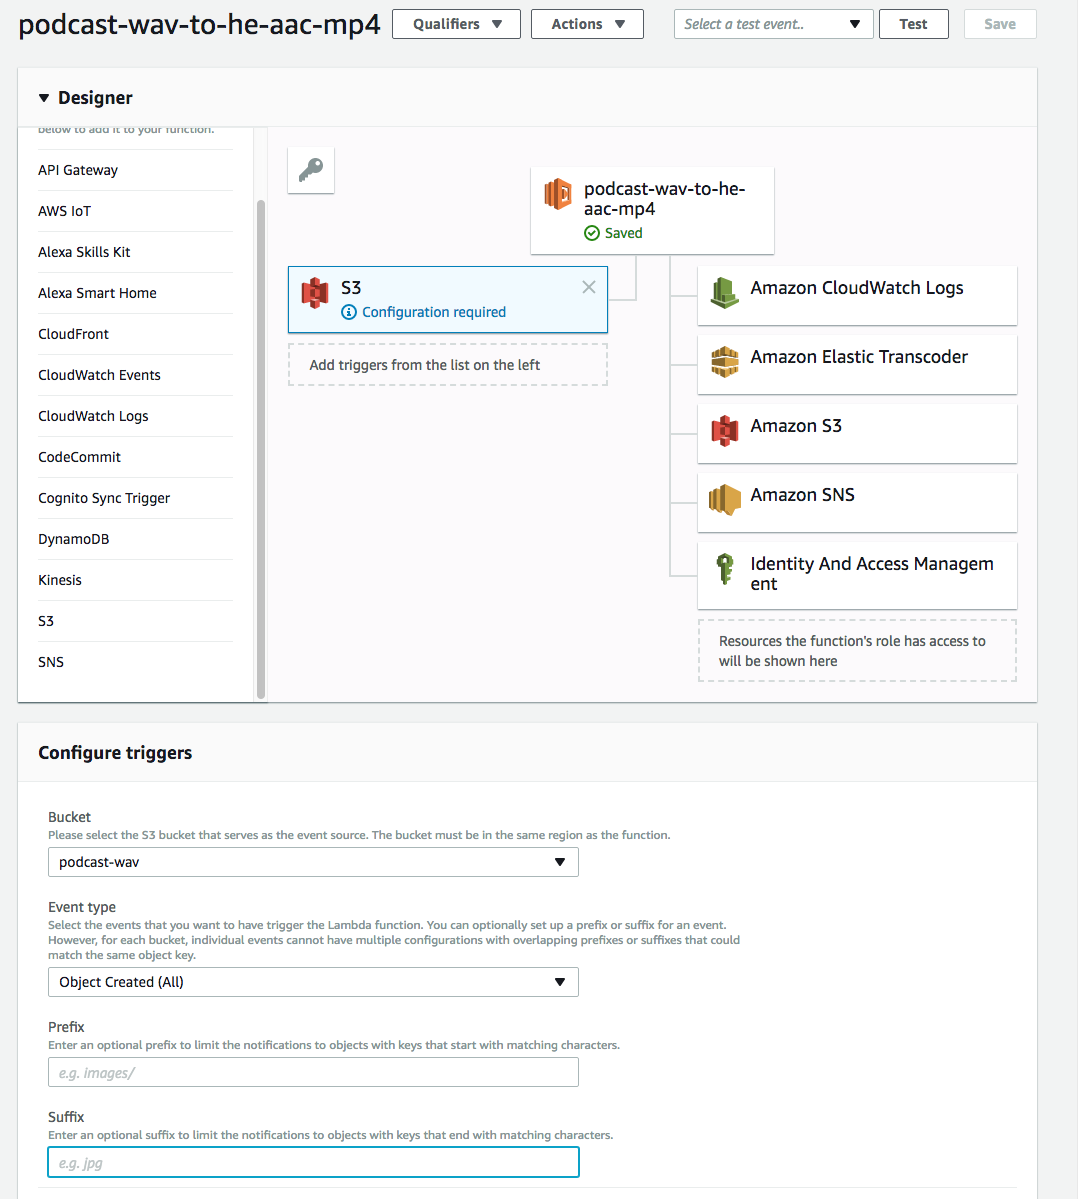
Step 12 - Configure your trigger
Your trigger is what will initiate the transcoder. In this example, you want a WAV file to start converting to MP4 once it has been successfully uploaded to an S3 bucket.
In the screenshot below, I picked S3 as my main trigger device. Then I set the Bucket to "podcast-wav" and event type to "Object Created (All)". This means that anytime I successfully upload a wav file, the Elastic Transcoder will start.
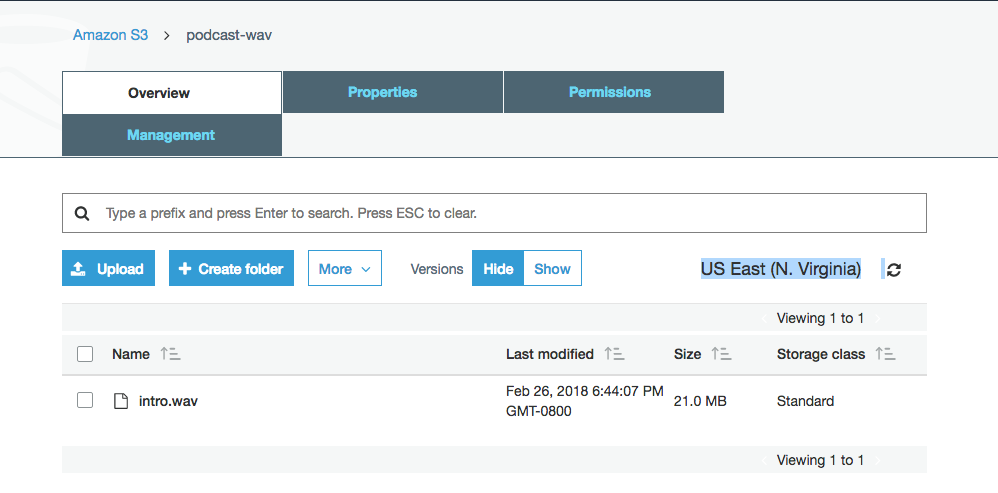
Step 13 - Demo time!
Phew, that was epic. Now it's time to test out all of our hard work. Go to your S3 console and upload a file into your bucket.
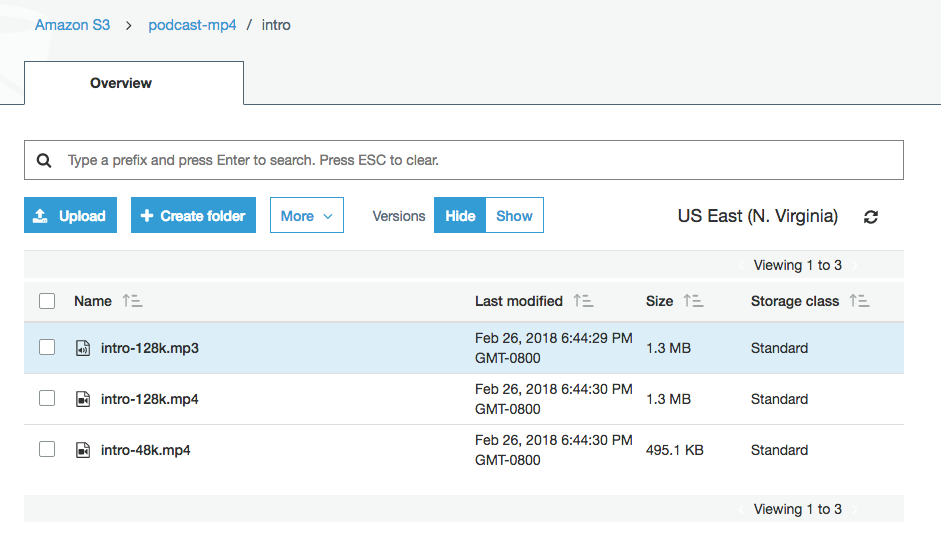
If things worked out, you should see three files within your MP4 folder!
Thank you!
If you have any questions, complaints, or concerns. Don't hesitate to share your comment below.
Resources
If you want to download these files, you can find them in my Github repo