I've been working with the Stripe API lately and I thought it might be handy to write a simple Ruby on Rails application that integrates Ruby on Rails, Devise and Stripe.
Step 1 - Setting up your Environment
First things first, you need to make sure you've installed Homebrew
Upgrading Ruby and installing Rails
There are two ways to upgrade Ruby on Mac and the differences are so subtle that they really only matter to the most dogmatic of Rubyists. Rather than split hairs, just pick one:
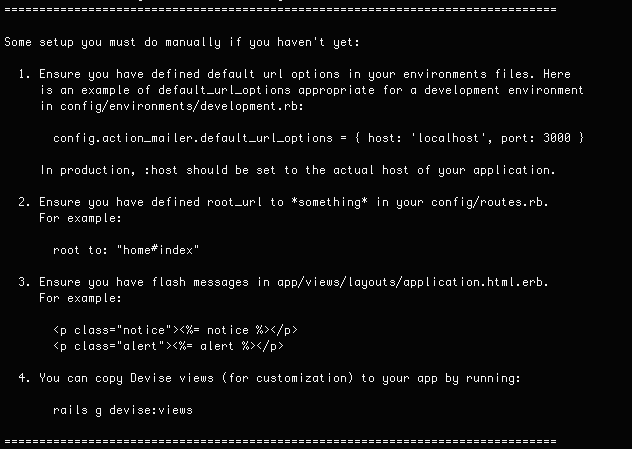
Finishing Touches
A proper Rails app generally requires a database such as MongoDB, MySQL, or PostgreSQL. If homebrew in installed on your computer, follow these 4 simple steps to help you install a database
Step 2 - Create a new rails app
Create your new app and use postgres for a database.
rails new name_of_app -d postgresql
Through Terminal, change into your web app.
cd /path/to/name_of_app
Install any pre-existing gem into your rails app.
bundle install
Create the database
rails db:create
Step 3 - Install Devise gem
Install Devise
Open up your Gemfile and add the devise gem.
# Devise Authentication for Rails 5
gem 'devise', git: 'https://github.com/plataformatec/devise.git'
Run the bundle command to install devise
rails g devise:install
Configure Devise
Once you run the bundle command, you'll see that devise provides you with a set of instructions. I suggest you follow the steps.
- If you're using Rails 5 API mode, you don't need to complete items #3 and #4.
Create the Devise Model
Now that you've installed devise, it's time to create a user model.
rails g devise user
Once you've created your model, update the datbase.
rails db:migrate
Create a controller
Create a home controller with a view named "index".
rails g controller home index
Tweak the controller
Add this code fragment to /app/controllers/home_controller.rb. This allows you authenticate a user before anything is accessed or changed.
class HomeController < ApplicationController
   before_filter :authenticate_user!
Start your server
rails s
Review your work
Now that you've created a model and upgraded your database, you can now run your rails server and test out the app with the links below.
These links are auto created by Devise.
http://localhost:3000/users/sign_up => new_user_session
http://localhost:3000/users/sign_in => destroy_user_session
http://localhost:3000/users/password/new => new_user_registration
Customizing Devise
Your UIX designer is very likely going to want to brand your app and change the design of the log-in views. All you need to do is tell Devise to generate the views so that you can modify them.
Custom Views
rails g devise:views
Custom Login
If your Dir of Product prefers your users to log-in using a username instead of an e-mail address, you can easily make that change by modifying the User model. Here's how to replace e-mail with username.
rails g migration add_username_to_users username:string
Now update your database.
rails db:migrate
Then modify devise config/initializers/devise.rb and add this:
Devise.setup do |config|
...
config.authentication_keys   = [:username]
config.case_insensitive_keys = [:username]
config.strip_whitespace_keys = [:username]
...
end
The final step is update the view to accomodate for username app/views/devise/sessions/new.html.erb
<h2>Sign in</h2>
...
<%= form_for(resource, :as => resource_name, :url => session_ path(resource_name)) do |f| %>
<div><%= f.label :username %><br />

<%= f.text_field :username, :autofocus => true %><div>
...
Email Confirmation
If you want users to confirm their registration through e-mail, here's how:
Step 1
Modify config/environments/development.rb
#CHANGED
#config.action_mailer.default_url_options = { host: 'localhost', port: 3000 }

config.action_mailer.delivery_method = :smtp
config.action_mailer.perform_deliveries = true
config.action_mailer.raise_delivery_errors = true
config.action_mailer.smtp_settings = {
     :address => "smtp.mailgun.org",
     #:port => 587,
     :domain => "mydomain.com",
     :user_name => "my_username",
     :password => "S0M3P@Sswd",
     :authentication => 'plain',
     :enable_starttls_auto => true
}
Step 2
Add :confirmable to app/models/user.rb
class User < ApplicationRecord
...
  # :confirmable, :lockable, :timeoutable and :omniauthable
  devise :database_authenticatable, :registerable,
         :recoverable, :rememberable, :trackable, :validatable, :confirmable
...
end
Step 3
Modify your database
rails g migration add_confirmable_to_users unconfirmed_email:string confirmation_token:token:unique:index confirmed_at:string confirmation_sent_at:datetime password_reset_token:token
Then add this to your newly minted migration file in app/db/migrate/your_db_migration.rb
#your current data will be treated as if they have confirmed their account
User.update_all(:confirmed_at => Time.now)
Helpers
The Rails convention is to use helpers to streamline your code. Here are a few methods Devise offers out of the box.
You can ask your user to authenticate before they gain access to any controller.
authenticate_user!
Verify if a user is signed in.
user_signed_in?
Refer to the current_user.
current_user
Access the user's session.
user_session
Resources
Everything else you might possibly need can found from the authors of Devise.